Чему научит данная статься?
Статья окажется полезной для первопроходцев и для веб-разработчиков, это полная инструкция для разработки с нуля и публикации. Разбирается реальное приложение «Учет расходов», размещенное в google play. Это мое первое приложения, передача знаний от новичка к заблудшему.
- Понимаем азы
- Работаем с базой данных
- Делаем верстку
- Программируем
Как это произошло?
Написание данного приложения, было спровоцировано отсутствием необходимого функционала у имеющихся аналогов.
Есть множество подобных приложений, но к сожалению, они перегружены ненужными функциями.
Что требовалось и получилось?
Требования к моему приложению были следующие:
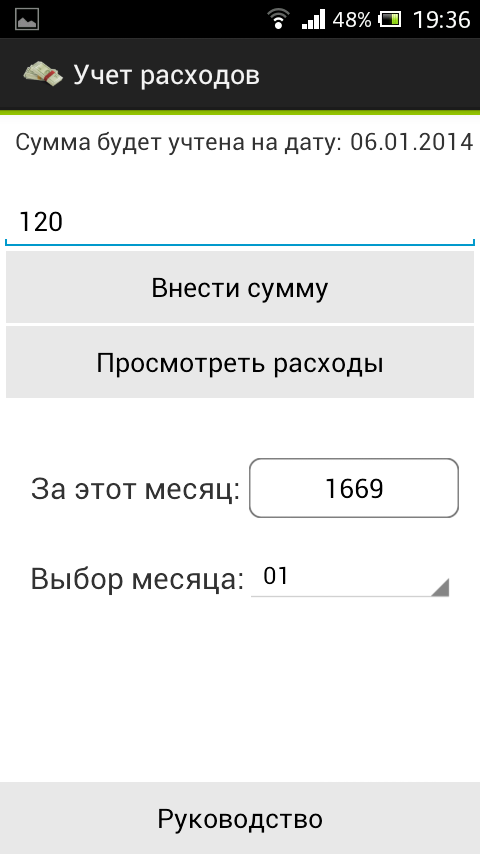
- Учет расхода за текущий месяц
- Ввод расхода, используя крупную клавишу «ввести расход»
- Обзор сумм расхода за этот месяц
- Обзор общей суммы затрат за данный месяц
- Обзор суммы за выбранный месяц
Пару слов о рабочем процессе
Готов проклинать вечно, верстку интерфейса с использование xml. На html/css я могу сверстать все что угодно, но когда дошло до подобной верстки, боевой настрой улетучился. Не хватаем в сети вводного материала на тему: xml интерфейсы для тех кто знает html/css. Я надеюсь ситуация в скором времени измениться. Не понятна логика размещения элементов, все перекашивается и не слушается. Убивает не способность задавать отдельный «бордер» (ввер, левый) для элементов интерфейса.
Разработка
Вы установили eclipse, плагины и вам удалось (после 10 минутных потугов на топовом ПК) запустить эмулятор? Теперь перед вами открываются возможность разработки под Android, одну из самых популярных операционных систем в мобильном мире.
Для начала создадим наш первый activity, который будет точкой входа в приложение activity_main.xml. Нам предлагается некая MVC структура:
com.laguna.sa — название моего package
Логика располагается в: название_проекта/src/com.laguna.sa/ *
Представления располагаются в: res/layout/ *
При создании activity, формируется файл логики и представления. При верстке нам предлагают множество непонятных элементов, из которых я выбрал LinearLayout. LinearLayout позволяет размешать в себе элементы. На выбор вертикаль и горизонталь. Указывается так android:orientation=«vertical». Для моих потребностей в данном приложении этого хватает, я даже border эмитировал используя LinearLayout высотой 3dp. Что то на подобие div в html.
activity_main.xml листинг часть 1:
<LinearLayout xmlns:android="http://schemas.android.com/apk/res/android"
    xmlns:tools="http://schemas.android.com/tools"
    android:layout_width="fill_parent"
    android:layout_height="fill_parent"
    android:background="#6c6c75"
    android:gravity="center"
    android:orientation="vertical"
    tools:context=".MainActivity" >

     <LinearLayout
         android:layout_width="fill_parent"
         android:layout_height="3dp"
         android:background="#99CC00"
         android:orientation="horizontal" >
     </LinearLayout>


</LinearLayout>
Сейчас тут содержится первый родительский слой с атрибутами android:layout_width и android:layout_height которые заданы как fill_parent, что указывает слою заполнить все и вся. Так же мы задаем расположения всего содержимого по центру android:gravity=«center».
Далее я создаю сексуальную зеленую полосу используя LinearLayout с высотой 3dp. Конечно не для этого задумывался данный элемент, но 1 раз так согрешить можно.
 <LinearLayout
         android:layout_width="fill_parent"
         android:layout_height="3dp"
         android:background="#99CC00"
         android:orientation="horizontal" >
     </LinearLayout>
На экране это выглядит так:

Следом за полосой, размещаю два поля для текста. Размещаю в новом LinearLayout, который делаю horizontal.
<LinearLayout
         android:layout_width="fill_parent"
         android:layout_height="wrap_content"
         android:background="#FFf"
         android:orientation="horizontal" >

         <TextView
             android:id="@+id/textView2"
             android:layout_width="wrap_content"
             android:layout_height="wrap_content"
             android:layout_marginBottom="3dp"
             android:layout_marginLeft="10dp"
             android:layout_marginRight="5dp"
             android:layout_marginTop="6dp"
             android:text="@string/text2"
             android:textSize="16sp" />

         <TextView
             android:id="@+id/textView1"
             android:layout_width="wrap_content"
             android:layout_height="wrap_content"
             android:layout_marginBottom="3dp"
             android:layout_marginTop="6dp"
             android:text="date"
             android:textSize="16sp" />

    </LinearLayout>
Тут все логически понятно, но стоит обратить внимание на заполнение текстом данных элементов. В нашем проекте есть папка values в которой хранится файл strings.xml. Данный файл содержит строки, который благодаря android:text="@string/text2" подгружает выше приведенный TextView. Текст можно указать непосредственно в коде, но в таком случае, будет мешать надоедливая табличка с ошибкой.
Для файла строк существует визуальный редактор, который позволяет редактировать строки не копаясь в коде. Позволительно добавлять не только строки но и прочие ресурсы. Но как понял я, строки и стили хранить нужно отдельно.
Естественно элементами интерфейса можно управлять программно. Приведу пример из проекта, где в тестовое поле вставляется актуальная дата.
        SimpleDateFormat sdf = new SimpleDateFormat("dd.MM.yyyy");
        String currentDateandTime = sdf.format(new Date());

        TextView textView1 = (TextView) findViewById(R.id.textView1);
        textView1.setText(currentDateandTime);
<LinearLayout xmlns:android="http://schemas.android.com/apk/res/android"
    xmlns:tools="http://schemas.android.com/tools"
    android:layout_width="fill_parent"
    android:layout_height="fill_parent"
    android:background="#6c6c75"
    android:gravity="center"
    android:orientation="vertical"
    tools:context=".MainActivity" >

     <LinearLayout
         android:layout_width="fill_parent"
         android:layout_height="3dp"
         android:background="#99CC00"
         android:orientation="horizontal" >
     </LinearLayout>

     <LinearLayout
         android:layout_width="fill_parent"
         android:layout_height="wrap_content"
         android:background="#FFf"
         android:orientation="horizontal" >

         <TextView
             android:id="@+id/textView2"
             android:layout_width="wrap_content"
             android:layout_height="wrap_content"
             android:layout_marginBottom="3dp"
             android:layout_marginLeft="10dp"
             android:layout_marginRight="5dp"
             android:layout_marginTop="6dp"
             android:text="@string/text2"
             android:textSize="16sp" />

         <TextView
             android:id="@+id/textView1"
             android:layout_width="wrap_content"
             android:layout_height="wrap_content"
             android:layout_marginBottom="3dp"
             android:layout_marginTop="6dp"
             android:text="date"
             android:textSize="16sp" />

    </LinearLayout>

    <LinearLayout
        android:layout_width="match_parent"
        android:layout_height="wrap_content"
        android:layout_marginLeft="0dp"
        android:layout_marginRight="0dp"
        android:layout_marginTop="0dp"
        android:background="#FFf"
        android:gravity="bottom"
        android:orientation="vertical" >

         <EditText
             android:id="@+id/amount"
             android:layout_width="match_parent"
             android:layout_height="wrap_content"
             android:layout_marginTop="20sp"
             android:ems="10"
             android:hint="@string/amount_of_expense" >

        </EditText>

        <Button
            android:id="@+id/button2"
            android:layout_width="match_parent"
            android:layout_height="wrap_content"
            android:layout_marginLeft="4dp"
            android:layout_marginRight="4dp"
            android:background="@drawable/mybtn_style_selector"
            android:onClick="makebutton_Click"
            android:text="@string/makebutton" />

                <Button
                    android:id="@+id/button3"
                    android:layout_width="match_parent"
                    android:layout_height="wrap_content"
                    android:layout_marginLeft="4dp"
                    android:layout_marginRight="4dp"
                    android:layout_marginTop="2dp"
                    android:background="@drawable/mybtn_style_selector"
                    android:onClick="costs_Click"
                    android:text="@string/costs" />

    </LinearLayout>

                 <LinearLayout
                     android:layout_width="match_parent"
                     android:layout_height="80sp"
                     android:layout_gravity="center_vertical"
                     android:layout_marginTop="0dp"
                     android:background="#fff"
                     android:orientation="horizontal" >

                     <TextView
                         android:id="@+id/amount_per_month_text"
                         android:layout_width="wrap_content"
                         android:layout_height="wrap_content"
                         android:layout_gravity="center"
                         android:layout_marginLeft="20dp"
                         android:layout_marginTop="20dp"
                         android:text="За этот месяц:"
                         android:textSize="20sp" />

                     <Button
                         android:id="@+id/amount_per_month"
                         android:layout_width="140dp"
                         android:layout_height="wrap_content"
                         android:layout_marginLeft="5dp"
                         android:layout_marginTop="40dp"
                         android:onClick="reload_Click"
                         android:background="@drawable/button321"
                         android:text="" />

        </LinearLayout>

                 <LinearLayout
                     android:layout_width="match_parent"
                     android:layout_height="80sp"
                     android:layout_gravity="center_vertical"
                     android:layout_marginTop="0dp"
                     android:background="#fff"
                     android:orientation="horizontal" >

                     <TextView
                         android:id="@+id/amount_per_month_text2"
                         android:layout_width="wrap_content"
                         android:layout_height="wrap_content"
                         android:layout_gravity="center"
                         android:layout_marginLeft="20dp"
                         android:layout_marginTop="0dp"
                         android:text="Выбор месяца:"
                         android:textSize="20sp" />

                     <Spinner
                         android:id="@+id/spinner_month"
                         android:layout_width="140dp"
                         android:layout_height="wrap_content"
                         android:layout_marginTop="20dp" >

                     </Spinner>
                 </LinearLayout>

        <LinearLayout
            android:layout_width="match_parent"
            android:layout_height="fill_parent"
            android:layout_marginTop="0dp"
            android:background="#FFf"
            android:gravity="bottom"
            android:orientation="vertical" >

            <Button
                android:id="@+id/button1"
                android:layout_width="match_parent"
                android:layout_height="wrap_content"
                android:background="@drawable/mybtn_style_selector"
                android:onClick="howtousebutton_Click"
                android:text="@string/howtousebutton" />

        </LinearLayout>


</LinearLayout>
package com.laguna.sa;

// тут импорт

@SuppressLint("SimpleDateFormat") public class MainActivity extends Activity {

    @Override
    protected void onCreate(Bundle savedInstanceState) {
        super.onCreate(savedInstanceState);
        setContentView(R.layout.activity_main);

        SimpleDateFormat sdf = new SimpleDateFormat("dd.MM.yyyy");
        String currentDateandTime = sdf.format(new Date());

        TextView textView1 = (TextView) findViewById(R.id.textView1);
        textView1.setText(currentDateandTime);

        // общая сумма за этот месяц

        WorkWithDatabase wwd = new WorkWithDatabase(this);
        Cursor cursor = wwd.total_amount_for_this_month();

        if(cursor.moveToFirst()) {

                Button amount_per_month = (Button ) findViewById(R.id.amount_per_month);
                amount_per_month.setText(""+cursor.getInt(0)+"");
        }

        String[] data = {"01", "02", "03", "04", "05", "06", "07", "08", "09", "10", "11", "12"};

        // адаптер
        ArrayAdapter<String> adapter = new ArrayAdapter<String>(this, android.R.layout.simple_spinner_item, data);
        adapter.setDropDownViewResource(android.R.layout.simple_spinner_dropdown_item);

        final Spinner spinner = (Spinner) findViewById(R.id.spinner_month);
        spinner.setAdapter(adapter);
        // заголовок
        spinner.setPrompt("месяц");

        spinner.setOnItemSelectedListener(new AdapterView.OnItemSelectedListener() {
            public void onItemSelected(AdapterView<?> adapterView, View view, int pos, long l) {

                String month = spinner.getSelectedItem().toString();
                set_selected_mont(month);

            }

            public void onNothingSelected(AdapterView<?> adapterView) {
                return;
            }
        });

    }

    @Override
    public boolean onCreateOptionsMenu(Menu menu) {
        // Inflate the menu; this adds items to the action bar if it is present.
        getMenuInflater().inflate(R.menu.main, menu);
        return true;
    }

    public void makebutton_Click(View v){

        // получаем дату
        TextView date = (TextView) findViewById(R.id.textView1);
        // получаем суммц
        EditText amount = (EditText) findViewById(R.id.amount);

        if(amount.toString() != "")
        {
                WorkWithDatabase wwd = new WorkWithDatabase(this);
            wwd.entry_costs(date, amount);

            // удаление цифр из поля
            amount.setText("");
            reload_Click(v);
        }

    }

    // обнавление общей суммы за этот месяц
    public void reload_Click(View v){

        WorkWithDatabase wwd = new WorkWithDatabase(this);
        Cursor cursor = wwd.total_amount_for_this_month();

        if(cursor.moveToFirst()) {

                Button amount_per_month = (Button ) findViewById(R.id.amount_per_month);
                amount_per_month.setText(""+cursor.getInt(0)+"");
        }

    }

    public void set_selected_mont(String month){

        WorkWithDatabase wwd = new WorkWithDatabase(this);
        Cursor cursor = wwd.total_amount_for_selected_month(month);

        if(cursor.moveToFirst()) {

                Button amount_per_month = (Button ) findViewById(R.id.amount_per_month);
                amount_per_month.setText(""+cursor.getInt(0)+"");
        }

    }


    // переход на просмотр расходов
    public void costs_Click(View v){
        Intent intent = new Intent(MainActivity.this,CostsActivity.class);
        startActivity(intent);
    }

    // переход к инструкции
    public void howtousebutton_Click(View v){
        Intent intent = new Intent(MainActivity.this, HowtouseActivity.class);
        startActivity(intent);
    }


}
Особо сложных действий которые нуждаются в объяснениях тут нет, единственное обращу внимание на способ навигации в приложении:
    // переход на просмотр расходов
    public void costs_Click(View v){
        Intent intent = new Intent(MainActivity.this,CostsActivity.class);
        startActivity(intent);
    }
Осуществляется переход от одного Activity к другому.
База данных и работа с ней
В Android для хранения локальных данных я использовал самое простое решение — SQLite и класс помощник SQLiteOpenHelper, который выполняет за меня всю грязную работу. Для тех, кто работал, к примеру с MySql, не должно возникнуть особых трудностей в освоении и понимании.
SQLiteOpenHelper также контролирует первоначальное создание базы данных в файлов системе, при необходимости делает «апгрейд».
package com.laguna.sa;

import java.text.SimpleDateFormat;
import java.util.Date;

import android.annotation.SuppressLint;
import android.content.ContentValues;
import android.content.Context;
import android.database.Cursor;
import android.database.sqlite.SQLiteDatabase;
import android.database.sqlite.SQLiteOpenHelper;
import android.widget.EditText;
import android.widget.TextView;

public class WorkWithDatabase extends SQLiteOpenHelper {


        // константы для конструктора
        private static final String DATABASE_NAME = "costs_database.db";
        private static final int DATABASE_VERSION = 1;
        //название таблицы и столбцы
        public static final String TABLE_NAME = "costs";
        public static final String UID = "_id";
        public static final String DATE = "date";
        public static final String AMOUNT = "amount";
        public static final String MONTH = "month";

    public WorkWithDatabase(Context context) {
                super(context, DATABASE_NAME, null, DATABASE_VERSION);
                // TODO Auto-generated constructor stub
        }


        // запрос для создания
        private static final String SQL_CREATE_ENTRIES = "create table if not exists " + TABLE_NAME + "( " + UID + "  integer primary key autoincrement, " + DATE + " text not null, " + AMOUNT + " integer not null, " + MONTH + " integer not null);";
        // запрос для удаления
        private static final String SQL_DELETE_ENTRIES = "DROP TABLE IF EXISTS " + TABLE_NAME;


        @Override
        public void onCreate(SQLiteDatabase db) {

                db.execSQL(SQL_CREATE_ENTRIES);

        }


        @Override
        public void onUpgrade(SQLiteDatabase db, int oldVersion, int newVersion) {

                // Удаляем предыдущую таблицу при апгрейде
                db.execSQL(SQL_DELETE_ENTRIES);
                // Создаём новый экземпляр таблицы
                onCreate(db);

        }


        // ------------------------------------------------------------------------------- //

        public void entry_costs(TextView date, EditText amount) {

                SQLiteDatabase wwd = this.getReadableDatabase();

        // получение месяца
        SimpleDateFormat sdf = new SimpleDateFormat("MM");
        String month = sdf.format(new Date());
        // внесение данных
        ContentValues values = new ContentValues();
        values.put("date", date.getText().toString());
        values.put("amount", amount.getText().toString());
        values.put("month", month.toString());
        wwd.insert("costs", null, values);
        wwd.close();


        }


        @SuppressLint("SimpleDateFormat")
        public Cursor obtaining_costs_for_this_month() {

                SQLiteDatabase wwd = this.getReadableDatabase();

                SimpleDateFormat sdf = new SimpleDateFormat("MM");
        String month = sdf.format(new Date());

        String query = "SELECT * FROM costs WHERE month = "+ month +" ORDER BY _id DESC";
                Cursor cursor = wwd.rawQuery(query, null);

                return cursor;
        }


        public Cursor total_amount_for_this_month() {

                SQLiteDatabase wwd = this.getReadableDatabase();

                SimpleDateFormat sdf2 = new SimpleDateFormat("MM");
        String month = sdf2.format(new Date());

        String query = "SELECT SUM(amount) FROM costs WHERE month=" + month + "";
        Cursor cursor = wwd.rawQuery(query, null);

                return cursor;

        }

    public Cursor total_amount_for_selected_month(String month) {

                SQLiteDatabase wwd = this.getReadableDatabase();

        String query = "SELECT SUM(amount) FROM costs WHERE month=" + month + "";
        Cursor cursor = wwd.rawQuery(query, null);

                return cursor;

        }


}
Обратите внимание, что для вставки данных используется:
ContentValues values = new ContentValues();
Вставка данных про принципу столбец -> значение.
Получение данных, процесс не сложный. Стоит прочитать отдельно про Cursor. В моем случае, я скармливаю сырые запросы rawQuery и работаю с Cursor'ом.
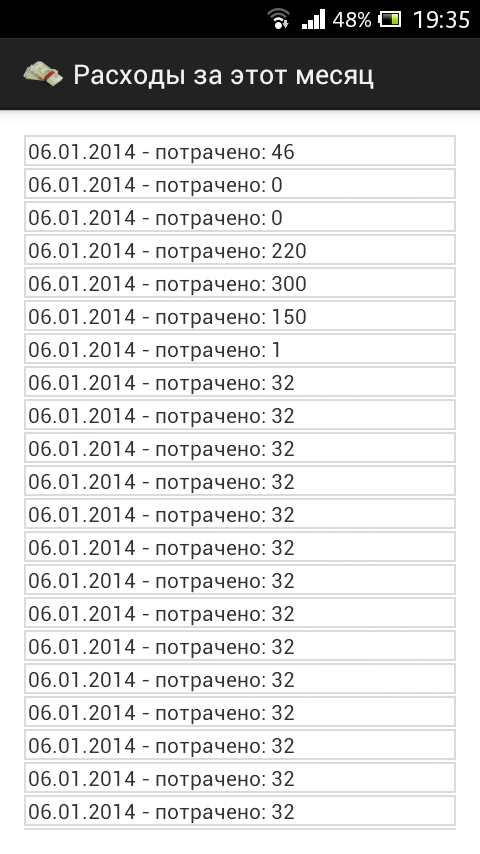
Тут пример вывода данных, листинг файла который выводит суммы на отдельном экране.
<RelativeLayout xmlns:android="http://schemas.android.com/apk/res/android"
    xmlns:tools="http://schemas.android.com/tools"
    android:layout_width="match_parent"
    android:layout_height="match_parent"
    android:paddingBottom="@dimen/activity_vertical_margin"
    android:paddingLeft="@dimen/activity_horizontal_margin"
    android:paddingRight="@dimen/activity_horizontal_margin"
    android:paddingTop="@dimen/activity_vertical_margin"
    android:background="#fff"
    tools:context=".CostsActivity" >


    <ScrollView
        android:id="@+id/scrollView1"
        android:layout_width="wrap_content"
        android:layout_height="wrap_content"
        android:layout_alignParentBottom="true"
        android:layout_alignParentLeft="true"
        android:layout_alignParentRight="true"
        android:layout_alignParentTop="true" >

        <LinearLayout
            android:id="@+id/costslist"
            android:layout_width="match_parent"
            android:layout_height="wrap_content"
            android:orientation="vertical" >


        </LinearLayout>
    </ScrollView>


</RelativeLayout>
package com.laguna.sa;


import android.os.Build;
import android.os.Bundle;
import android.annotation.SuppressLint;
import android.annotation.TargetApi;
import android.app.ActionBar.LayoutParams;
import android.app.Activity;
import android.database.Cursor;
import android.view.Menu;
import android.widget.LinearLayout;
import android.widget.TextView;

public class CostsActivity extends Activity {

        @SuppressWarnings("deprecation")
        @SuppressLint("NewApi")
        @Override
        protected void onCreate(Bundle savedInstanceState) {
                super.onCreate(savedInstanceState);
                setContentView(R.layout.activity_costs);

                LinearLayout linearLayout = (LinearLayout)findViewById(R.id.costslist);

                int sdk = android.os.Build.VERSION.SDK_INT;

                WorkWithDatabase wwd = new WorkWithDatabase(this);
                Cursor cursor = wwd.obtaining_costs_for_this_month();

                while (cursor.moveToNext()) {
                        int amount = cursor.getInt(cursor.getColumnIndex("amount"));

                        String date = cursor.getString(cursor.getColumnIndex("date"));

                        TextView dateTv = new TextView(this);

                        LinearLayout.LayoutParams llp = new LinearLayout.LayoutParams(LayoutParams.MATCH_PARENT, LayoutParams.MATCH_PARENT);
                        llp.setMargins(0, 1, 0, 1); // llp.setMargins(left, top, right, bottom);
                        //------------------------------------------------------------

                        if(sdk < android.os.Build.VERSION_CODES.JELLY_BEAN) {
                            dateTv.setBackgroundDrawable(getResources().getDrawable(R.drawable.test));
                        } else {
                                dateTv.setBackground(getResources().getDrawable(R.drawable.test));
                        }
                        //------------------------------------------------------------
                        dateTv.setLayoutParams(llp);
                        dateTv.setPadding(4, 1, 2, 1);
                        dateTv.setText(date + " - потрачено: " + amount);
                        linearLayout.addView(dateTv);

                }
                cursor.close();


        }

        @Override
        public boolean onCreateOptionsMenu(Menu menu) {
                // Inflate the menu; this adds items to the action bar if it is present.
                getMenuInflater().inflate(R.menu.costs, menu);
                return true;
        }

}
В цикле проходим по всем значениям и получаем нужные. Там же формируем необходимое количество TextView, добавляем стилей и готово.
Программа жаловалась на методы, не поддерживаемые некоторыми версиями ОС. Пришлось прибегать к проверкам версий, для задания Background. Буду благодарен если в комментариях направят на путь истинный касательно setBackground.
Публикация и результат.
Публикация мне понравилась, все произошло быстро и без лишних хлопот. Великолепная консоль разработчика, интуитивно понятные настройки. Приложение размещенное вечером, было доступно уже ночью.
Само приложение:

This entry passed through the Full-Text RSS service — if this is your content and you're reading it on someone else's site, please read the FAQ at fivefilters.org/content-only/faq.php#publishers.
Комментариев нет:
Отправить комментарий