Разработчику достаточно вызвать пару методов – и вот в его приложении уже доступна камера, которая автоматически сканирует документы. Но, помимо настроенных камер, нужно предоставить клиентам удобный доступ к результатам сканирования, т.е. автоматически сделанным фотографиям. А если клиент сканирует договор или устав, то таких фотографий может быть очень много.
В этом посте я расскажу о трудностях, которые возникли в процессе реализации экрана редактора с результатами захвата документов. Сам экран представляет из себя две UICollectionView, я их буду называть большой и маленькой. Возможности ручной корректировки границ документа и другой работы с документом я опущу, а фокус сделаю на анимациях и особенностях layout-а во время скролла. Ниже на GIF можно посмотреть, что получилось в итоге. Ссылка на репозиторий будет в конце статьи.

В качестве референсов я часто обращаю внимание на системные приложения Apple. Когда внимательно смотришь на анимации и другие интерфейсные решения их приложений, то начинаешь восхищаться их внимательным отношением к разного рода мелочам. Сейчас мы в качестве референса будем смотреть на приложение Photos (iOS 12). Я обращу ваше внимание на конкретные фичи этого приложения, а дальше мы попробуем их реализовать.
Мы коснемся большинства возможностей кастомизации UICollectionViewFlowLayout, посмотрим, как реализуются такие распространенные приемы, как parallax и caroucel, а также обсудим проблемы, связанные с кастомными анимациями при вставке и удалении ячеек.
Обзор фич
Чтобы добавить конкретики, я опишу, какие конкретно мелочи порадовали меня в приложении Photos, а дальше буду их реализовывать в соответствующем порядке.
- Parallax effect в большой коллекции
- Элементы маленькой коллекции центрированы
- Динамический размер элементов маленькой коллекции
- Логика размещения элементов маленькой ячейки зависит не только от contentOffset-а, но и от пользовательских взаимодействий
- Кастомные анимации для move и delete
- Индекс «активной» ячейки не теряется при смене ориентации
1. Parallax
Что такое параллакс?
Parallax scrolling is a technique in computer graphics where background images move past the camera more slowly than foreground images, creating an illusion of depth in a 2D scene and adding to the sense of immersion in the virtual experience.Можно заметить, что при скролле фрейм ячейки движется быстрее, чем изображение, которое в ней находится.
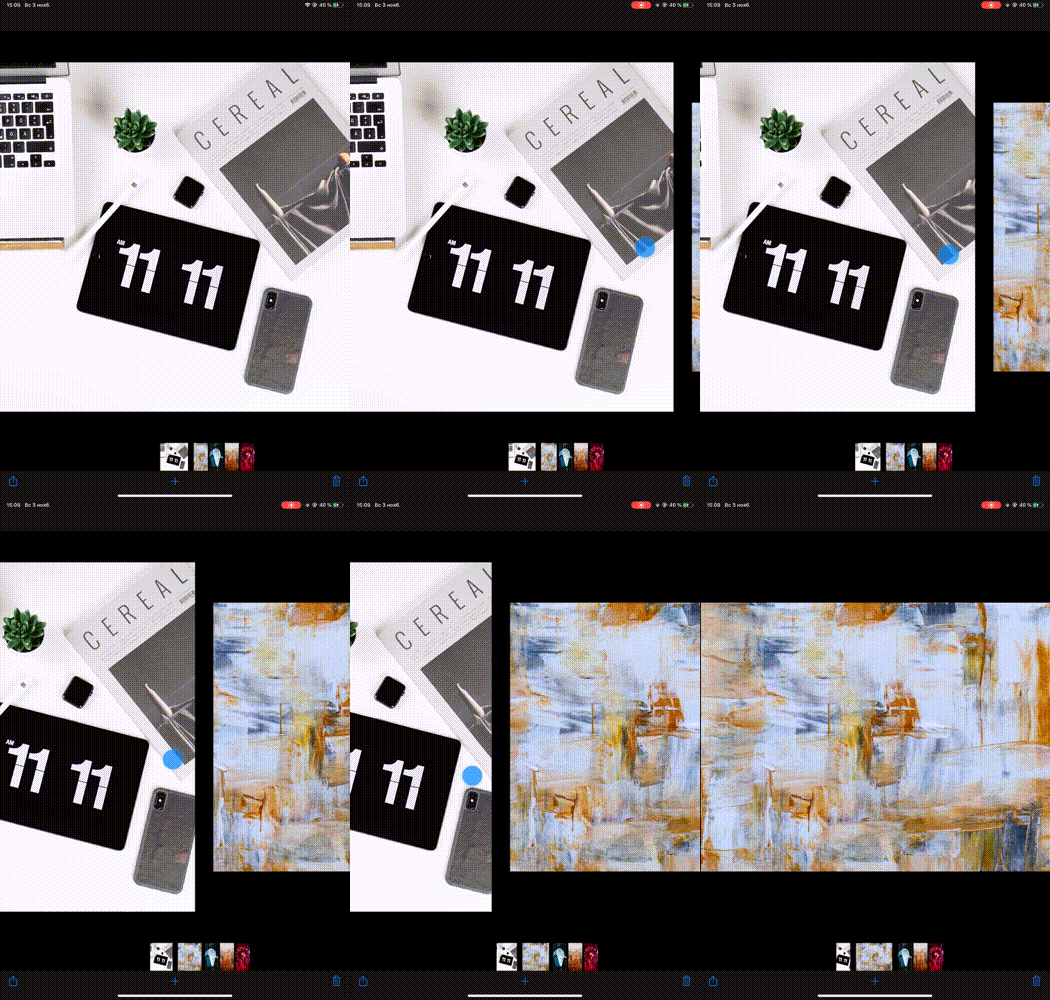

Давайте приступать к реализации! Создадим сабкласс ячейки, засунем в нее UIImageView.
class PreviewCollectionViewCell: UICollectionViewCell {
private(set) var imageView = UIImageView()
override init(frame: CGRect) {
super.init(frame: frame)
addSubview(imageView)
clipsToBounds = true
imageView.snp.makeConstraints {
$0.edges.equalToSuperview()
}
}
}
Теперь нужно понять, как сдвигать
imageView, создавая эффект параллакса. Для этого нужно переопределить поведение ячеек при скролле. Apple:Avoid subclassing UICollectionView. The collection view has little or no appearance of its own. Instead, it pulls all of its views from your data source object and all of the layout-related information from the layout object. If you are trying to lay out items in three dimensions, the proper way to do it is to implement a custom layout that sets the 3D transform of each cell and view appropriately.
Ок, давайте создадим свой layout object. У UICollectionView есть свойство collectionViewLayout, у которого она узнает информацию о позиционировании ячеек. UICollectionViewFlowLayout является реализацией абстрактного UICollectionViewLayout, которым и является свойство collectionViewLayout.Создадим сабклассUICollectionViewLayoutis waiting for someone to subclass it and provide the appropriate content.UICollectionViewFlowLayoutis a concrete class ofUICollectionViewLayoutthat has all its four members implemented, in the way that the cells will be arranged in a grid manner.
UICollectionViewFlowLayout и переопределим у него layoutAttributesForElements(in:). Метод возвращает массив UICollectionViewLayoutAttributes, предоставляющий информацию о том, как конкретную ячейку показывать.
Коллекция запрашивает атрибуты каждый раз, когда меняется contentOffset, а также при инвалидации лейаута. В добавок создадим кастомные атрибуты, добавив свойство parallaxValue, которое определяет, на сколько задерживается смещение фрейма картинки от фрейма ячейки. Для сабклассов атрибутов необходимо переопределить для них NSCopiyng. Apple:
If you subclass and implement any custom layout attributes, you must also override the inherited isEqual: method to compare the values of your properties. In iOS 7 and later, the collection view does not apply layout attributes if those attributes have not changed. It determines whether the attributes have changed by comparing the old and new attribute objects using the isEqual: method. Because the default implementation of this method checks only the existing properties of this class, you must implement your own version of the method to compare any additional properties. If your custom properties are all equal, callКак узнатьsuperand return the resulting value at the end of your implementation.
parallaxValue? Посчитаем, насколько нужно сдвинуть центр ячейки, чтобы она встала в центр. Если это расстояние больше, чем ширина ячейки, то забьем на нее. Иначе — поделим это расстояние на ширину ячейки. Чем ближе это расстояние к нулю, тем слабее эффект параллакса.
class ParallaxLayoutAttributes: UICollectionViewLayoutAttributes {
var parallaxValue: CGFloat?
}
class PreviewLayout: UICollectionViewFlowLayout {
var offsetBetweenCells: CGFloat = 44
override func shouldInvalidateLayout(forBoundsChange newBounds: CGRect) -> Bool {
return true
}
override class var layoutAttributesClass: AnyClass {
return ParallaxLayoutAttributes.self
}
override func layoutAttributesForElements(in rect: CGRect) -> [UICollectionViewLayoutAttributes]? {
return super.layoutAttributesForElements(in: rect)?
.compactMap { $0.copy() as? ParallaxLayoutAttributes }
.compactMap(prepareAttributes)
}
private func prepareAttributes(attributes: ParallaxLayoutAttributes) -> ParallaxLayoutAttributes {
guard let collectionView = self.collectionView else { return attributes }
let width = itemSize.width
let centerX = width / 2
let distanceToCenter = attributes.center.x - collectionView.contentOffset.x
let relativeDistanceToCenter = (distanceToCenter - centerX) / width
if abs(relativeDistanceToCenter) >= 1 {
attributes.parallaxValue = nil
attributes.transform = .identity
} else {
attributes.parallaxValue = relativeDistanceToCenter
attributes.transform = CGAffineTransform(translationX: relativeDistanceToCenter * offsetBetweenCells, y: 0)
}
return attributes
}
}
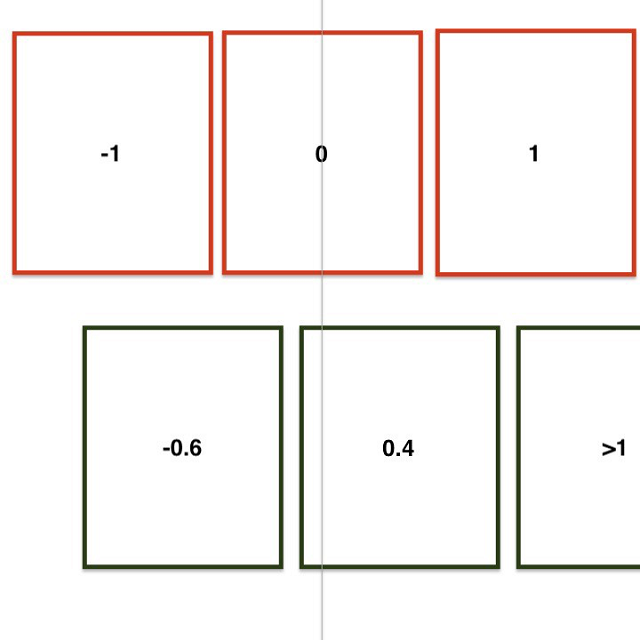

Когда коллекция получает необходимые атрибуты, ячейки их применяют. Это поведение можно переопределить у сабкласса ячейки. Сдвинем
imageView на величину, зависящую от parallaxValue. Однако для корректной работы сдвига картинок с contentMode == .aspectFit этого недостаточно, потому что фрейм картинки не совпадает с фреймом imageView, по которому обрезается контент при clipsToBounds == true. Наложим маску, совпадающую с размером картинки при соответствующем contentMode и будем ее обновлять при необходимости. Теперь все работает!
extension PreviewCollectionViewCell {
override func layoutSubviews() {
super.layoutSubviews()
guard let imageSize = imageView.image?.size else { return }
let imageRect = AVMakeRect(aspectRatio: imageSize, insideRect: bounds)
let path = UIBezierPath(rect: imageRect)
let shapeLayer = CAShapeLayer()
shapeLayer.path = path.cgPath
layer.mask = shapeLayer
}
override func apply(_ layoutAttributes: UICollectionViewLayoutAttributes) {
guard let attrs = layoutAttributes as? ParallaxLayoutAttributes else {
return super.apply(layoutAttributes)
}
let parallaxValue = attrs.parallaxValue ?? 0
let transition = -(bounds.width * 0.3 * parallaxValue)
imageView.transform = CGAffineTransform(translationX: transition, y: .zero)
}
}
2. Элементы маленькой коллекции центрированы


Тут все очень просто. Такого эффекта можно добиться, выставив большие
inset-ы и слева и справа. Необходимо, чтобы при скролле вправо/влево, bouncing начинался только тогда, когда крайняя ячейка вышла из видимого контента. То есть видимый контент должен равняться размеру ячейки.
extension ThumbnailFlowLayout {
var farInset: CGFloat {
guard let collection = collectionView else { return .zero }
return (collection.bounds.width - itemSize.width) / 2
}
var insets: UIEdgeInsets {
UIEdgeInsets(top: .zero, left: farInset, bottom: .zero, right: farInset)
}
override func prepare() {
collectionView?.contentInset = insets
super.prepare()
}
}
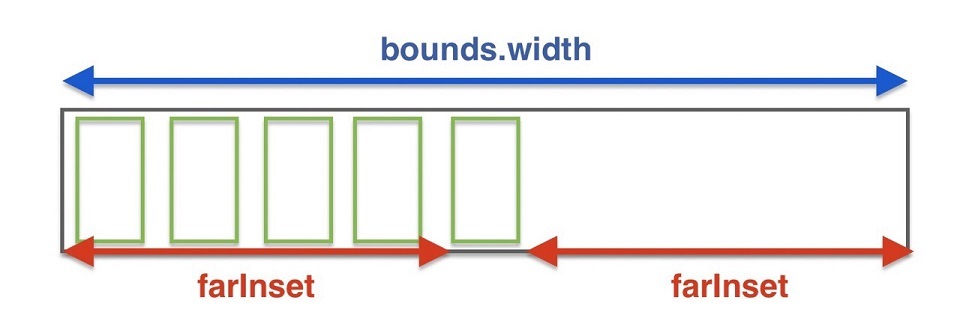

Еще про центрирование: когда коллекция заканчивает скроллиться, лейаут запрашивает contentOffset, на котором нужно остановиться. Для этого нужно переопределить targetContentOffset(forProposedContentOffset:withScrollingVelocity:). Apple:
If you want the scrolling behavior to snap to specific boundaries, you can override this method and use it to change the point at which to stop. For example, you might use this method to always stop scrolling on a boundary between items, as opposed to stopping in the middle of an item.Чтобы все было красиво, будем всегда останавливаться в центре ближайшей ячейки. Вычислить центр ближайшей ячейки довольно тривиальная задача, однако нужно быть внимательным и учитывать
contentInset.
override func targetContentOffset(forProposedContentOffset proposedContentOffset: CGPoint,
withScrollingVelocity velocity: CGPoint) -> CGPoint {
guard let collection = collectionView else {
return super.targetContentOffset(forProposedContentOffset: proposedContentOffset,
withScrollingVelocity: velocity)
}
let cellWithSpacing = itemSize.width + config.distanceBetween
let relative = (proposedContentOffset.x + collection.contentInset.left) / cellWithSpacing
let leftIndex = max(0, floor(relative))
let rightIndex = min(ceil(relative), CGFloat(itemsCount))
let leftCenter = leftIndex * cellWithSpacing - collection.contentInset.left
let rightCenter = rightIndex * cellWithSpacing - collection.contentInset.left
if abs(leftCenter - proposedContentOffset.x) < abs(rightCenter - proposedContentOffset.x) {
return CGPoint(x: leftCenter, y: proposedContentOffset.y)
} else {
return CGPoint(x: rightCenter, y: proposedContentOffset.y)
}
}

3. Динамический размер элементов маленькой коллекции
Если скроллить большую коллекцию,
contentOffset меняется и у маленькой. Причем центральная ячейка маленькой коллекции имеет не такой размер, как остальные. Побочные ячейки имеют фиксированный размер, а центральная — совпадающий с отношением сторон картинки, которую она содержит.


Можно воспользоваться тем же приемом, что и в случае параллакса. Создадим кастомный
UICollectionViewFlowLayout для маленькой коллекции и переопределим prepareAttributes(attributes:. Учитывая, что далее логика лэйаута маленькой коллекции будем усложняться, создадим отдельную сущность для хранения и вычисления геометрии ячеек.
struct Cell {
let indexPath: IndexPath
let dims: Dimensions
let state: State
func updated(new state: State) -> Cell {
return Cell(indexPath: indexPath, dims: dims, state: state)
}
}
extension Cell {
struct Dimensions {
let defaultSize: CGSize
let aspectRatio: CGFloat
let inset: CGFloat
let insetAsExpanded: CGFloat
}
struct State {
let expanding: CGFloat
static var `default`: State {
State(expanding: .zero)
}
}
}
UICollectionViewFlowLayout имеет свойство collectionViewContentSize, определяющее размер области, которую можно скроллить. Чтобы не усложнять себе жизнь, оставим ее постоянной, не зависящей от размера центральной ячейки. Для корректной геометрии для каждой ячейки нужно знать aspectRatio картинки и удаленность центра ячейки от contentOffset. Чем ближе ячейка, тем ближе ее size.width / size.height к aspectRatio. При изменении размера конкретной ячейки, остальные ячейки (справа и слева от нее) отодвинем при помощи affineTransform. Получается, что для расчета геометрии конкретной ячейки нужно знать атрибуты соседей (видимых).
extension Cell {
func attributes(from layout: ThumbnailLayout,
with sideCells: [Cell]) -> UICollectionViewLayoutAttributes? {
let attributes = layout.layoutAttributesForItem(at: indexPath)
attributes?.size = size
attributes?.center = center
let translate = sideCells.reduce(0) { (current, cell) -> CGFloat in
if indexPath < cell.indexPath {
return current - cell.additionalWidth / 2
}
if indexPath > cell.indexPath {
return current + cell.additionalWidth / 2
}
return current
}
attributes?.transform = CGAffineTransform(translationX: translate, y: .zero)
return attributes
}
var additionalWidth: CGFloat {
(dims.defaultSize.height * dims.aspectRatio - dims.defaultSize.width) * state.expanding
}
var size: CGSize {
CGSize(width: dims.defaultSize.width + additionalWidth,
height: dims.defaultSize.height)
}
var center: CGPoint {
CGPoint(x: CGFloat(indexPath.row) * (dims.defaultSize.width + dims.inset) + dims.defaultSize.width / 2,
y: dims.defaultSize.height / 2)
}
}state.expanding считается почти так же, как и parallaxValue.
func cell(for index: IndexPath, offsetX: CGFloat) -> Cell {
let cell = Cell(
indexPath: index,
dims: Cell.Dimensions(
defaultSize: itemSize,
aspectRatio: dataSource(index.row),
inset: config.distanceBetween,
insetAsExpanded: config.distanceBetweenFocused),
state: .default)
guard let attribute = cell.attributes(from: self, with: []) else { return cell }
let cellOffset = attribute.center.x - itemSize.width / 2
let widthWithOffset = itemSize.width + config.distanceBetween
if abs(cellOffset - offsetX) < widthWithOffset {
let expanding = 1 - abs(cellOffset - offsetX) / widthWithOffset
return cell.updated(by: .expand(expanding))
}
return cell
}
override func layoutAttributesForElements(in rect: CGRect) -> [UICollectionViewLayoutAttributes]? {
return (0 ..< itemsCount)
.map { IndexPath(row: $0, section: 0) }
.map { cell(for: $0, offsetX: offsetWithoutInsets.x) }
.compactMap { $0.attributes(from: self, with: cells) }
}4. Логика размещения элементов маленькой ячейки зависит не только от contentOffset-а, но и от пользовательских взаимодействий
Когда пользователь скроллит маленькую коллекцию, все ячейки принимают одинаковый размер. При скролле большой коллекции это не так. (см гифки 3 и 5). Давайте напишем аниматор, который будет обновлять свойства лейаута
ThumbnailLayout. Аниматор будет хранить в себе DisplayLink и 60 раз в секунду звать блок, предоставляя доступ к текущему прогрессу. К аниматору легко прикрутить различные easing functions. Реализацию можно посмотреть на гитхабе по ссылке в конце поста.
Заведем в ThumbnailLayout свойство expandingRate, на которое будут умножаться expanding всех Cell. Получается, что expandingRate говорит, насколько aspectRatio конкретной картинки будет влиять на ее размер, если она становится в центр. При expandingRate == 0 все ячейки будут одного размера. При старте скролла маленькой коллекции будем запускать аниматор, переводящий expandingRate в 0, а в конце скролла — наоборот, в 1. По факту, при обновлении лейаута будет меняться размер центральной ячейки и transform побочных. Никакой лажи с contentOffset и подергиваниями!
class ScrollAnimation: NSObject {
enum `Type` {
case begin
case end
}
let type: Type
func run(completion: @escaping () -> Void) {
let toValue: CGFloat = self.type == .begin ? 0 : 1
let currentExpanding = thumbnails.config.expandingRate
let duration = TimeInterval(0.15 * abs(currentExpanding - toValue))
let animator = Animator(onProgress: { current, _ in
let rate = currentExpanding + (toValue - currentExpanding) * current
self.thumbnails.config.expandingRate = rate
self.thumbnails.invalidateLayout()
}, easing: .easeInOut)
animator.animate(duration: duration) { _ in
completion()
}
}
}
func scrollViewWillBeginDragging(_ scrollView: UIScrollView) {
if scrollView == thumbnails.collectionView {
handle(event: .beginScrolling) // call ScrollAnimation.run(type: .begin)
}
}
func scrollViewDidEndDragging(_ scrollView: UIScrollView, willDecelerate decelerate: Bool) {
if scrollView == thumbnails.collectionView && !decelerate {
thumbnailEndScrolling()
}
}
func scrollViewDidEndDecelerating(_ scrollView: UIScrollView) {
if scrollView == thumbnails.collectionView {
thumbnailEndScrolling()
}
}
func thumbnailEndScrolling() {
handle(event: .endScrolling) // call ScrollAnimation.run(type: .end)
}
5. Кастомные анимации для move и delete
Есть много статей, рассказывающих, как делать кастомные анимации для обновления ячеек, однако в нашем случае они нам не помогут. В статьях и туториалах рассказывается, как переопределить атрибуты обновляемой ячейки. В нашем случае изменение лейаута удаляемой ячейки вызывают сайд эффекты — изменяется
expanding соседней ячейки, которая стремится занять место удаляемой во время анимации.
Обновление контента в UICollectionViewFlowLayout работает следующим образом. После удаления/добавления ячейки запускается метод prepare(forCollectionViewUpdates:), дающий массив UICollectionViewUpdateItem, который говорит нам, ячейки на каких индексах обновили/удалили/добавили. Далее лейаут будет звать группу методов
finalLayoutAttributesForDisappearingItem(at:)
initialLayoutAttributesForAppearingDecorationElement(ofKind:at:)
и их друзей для decoration/supplementary views. Когда атрибуты для обновляемых данных получены, вызывается
finalizeCollectionViewUpdates. Apple:The collection view calls this method as the last step before proceeding to animate any changes into place. This method is called within the animation block used to perform all of the insertion, deletion, and move animations so you can create additional animations using this method as needed. Otherwise, you can use it to perform any last minute tasks associated with managing your layout object’s state information.Беда заключается в том, что мы можем специализировать атрибуты только для обновляемой ячейки, а нам необходимо менять их у всех ячеек, причем по-разному. Новая центральная ячейка должна менять
aspectRatio, а побочные — transform.


Поисследовав то, как работает дефолтное анимирование ячеек коллекции при удалении/вставке, стало известно, что layer-ы ячеек в
finalizeCollectionViewUpdates содержат CABasicAnimation, которые там можно поменять, если ты хочешь кастомизировать анимацию для остальных ячеек. Все стало хуже, когда логи показали, что между performBatchUpdates и prepare(forCollectionViewUpdates:) вызывается prepareAttributes(attributes:), а там уже может быть неверное количество ячеек, хотя collectionViewUpdates еще не начались, поддерживать и понимать такое очень сложно. Что же можно с этим сделать? Можно эти built-in анимации отключить!
final override func prepare(forCollectionViewUpdates updateItems: [UICollectionViewUpdateItem]) {
super.prepare(forCollectionViewUpdates: updateItems)
CATransaction.begin()
CATransaction.setDisableActions(true)
}
final override func finalizeCollectionViewUpdates() {
CATransaction.commit()
}

Вооружившись уже написанными аниматорами, будем делать все необходимые анимации по запросу на удаление, а обновление
dataSource будем запускать в конце анимации. Таким образом мы упростим анимирование коллекции при обновлении, так как сами управляем тем, когда будет изменяться количество ячеек.
func delete(
at indexPath: IndexPath,
dataSourceUpdate: @escaping () -> Void,
completion: (() -> Void)?) {
DeleteAnimation(thumbnails: thumbnails, preview: preview, index: indexPath).run {
let previousCount = self.thumbnails.itemsCount
if previousCount == indexPath.row + 1 {
self.activeIndex = previousCount - 1
}
dataSourceUpdate()
self.thumbnails.collectionView?.deleteItems(at: [indexPath])
self.preview.collectionView?.deleteItems(at: [indexPath])
completion?()
}
}Как будут работать подобные анимации? Давайте в
ThumbnailLayout хранить опциональные кложуры, обновляющие геометрию конкретных ячеек.
class ThumbnailLayout {
typealias CellUpdate = (Cell) -> Cell
var updates: [IndexPath: CellUpdate] = [:]
// ...
override func layoutAttributesForElements(in rect: CGRect) -> [UICollectionViewLayoutAttributes]? {
let cells = (0 ..< itemsCount)
.map { IndexPath(row: $0, section: 0) }
.map { cell(for: $0, offsetX: offsetWithoutInsets.x) }
.map { cell -> Cell in
if let update = self.config.updates[cell.indexPath] {
return update(cell)
}
return cell
}
return cells.compactMap { $0.attributes(from: self, with: cells)
}
}Имея такой инструмент, можно делать с геометрией ячеек что угодно, закидывая апдейты во время работы аниматора и убирая их в комплишоне. Также появляется возможность комбинирования апдейтов.
updates[index] = newUpdate(updates[index])
Код анимации удаления довольно громоздкий, он находится в файле DeleteAnimation.swift в репозитории. Таким же образом реализована и анимация переключения фокуса между ячейками.


6. Индекс “активной” ячейки не теряется при смене ориентации
scrollViewDidScroll(_ scrollView:) вызывается даже если просто засеттить в contentOffset какое-нибудь значение, а так же при смене ориентации. Когда скролл двух коллекций синхронизирован, при апдейтах лейаута могут возникать некоторые проблемы. Помогает следующий прием: на апдейтах лейаута можно ставить scrollView.delegate в nil.
extension ScrollSynchronizer {
private func bind() {
preview.collectionView?.delegate = self
thumbnails.collectionView?.delegate = self
}
private func unbind() {
preview.collectionView?.delegate = nil
thumbnails.collectionView?.delegate = nil
}
}При обновлении размеров ячеек на момент смены ориентации это будет выглядеть так:
extension PhotosViewController {
override func viewWillTransition(to size: CGSize, with coordinator: UIViewControllerTransitionCoordinator) {
super.viewWillTransition(to: size, with: coordinator)
contentView.synchronizer.unbind()
coordinator.animate(alongsideTransition: nil) { [weak self] _ in
self?.contentView.synchronizer.bind()
}
}
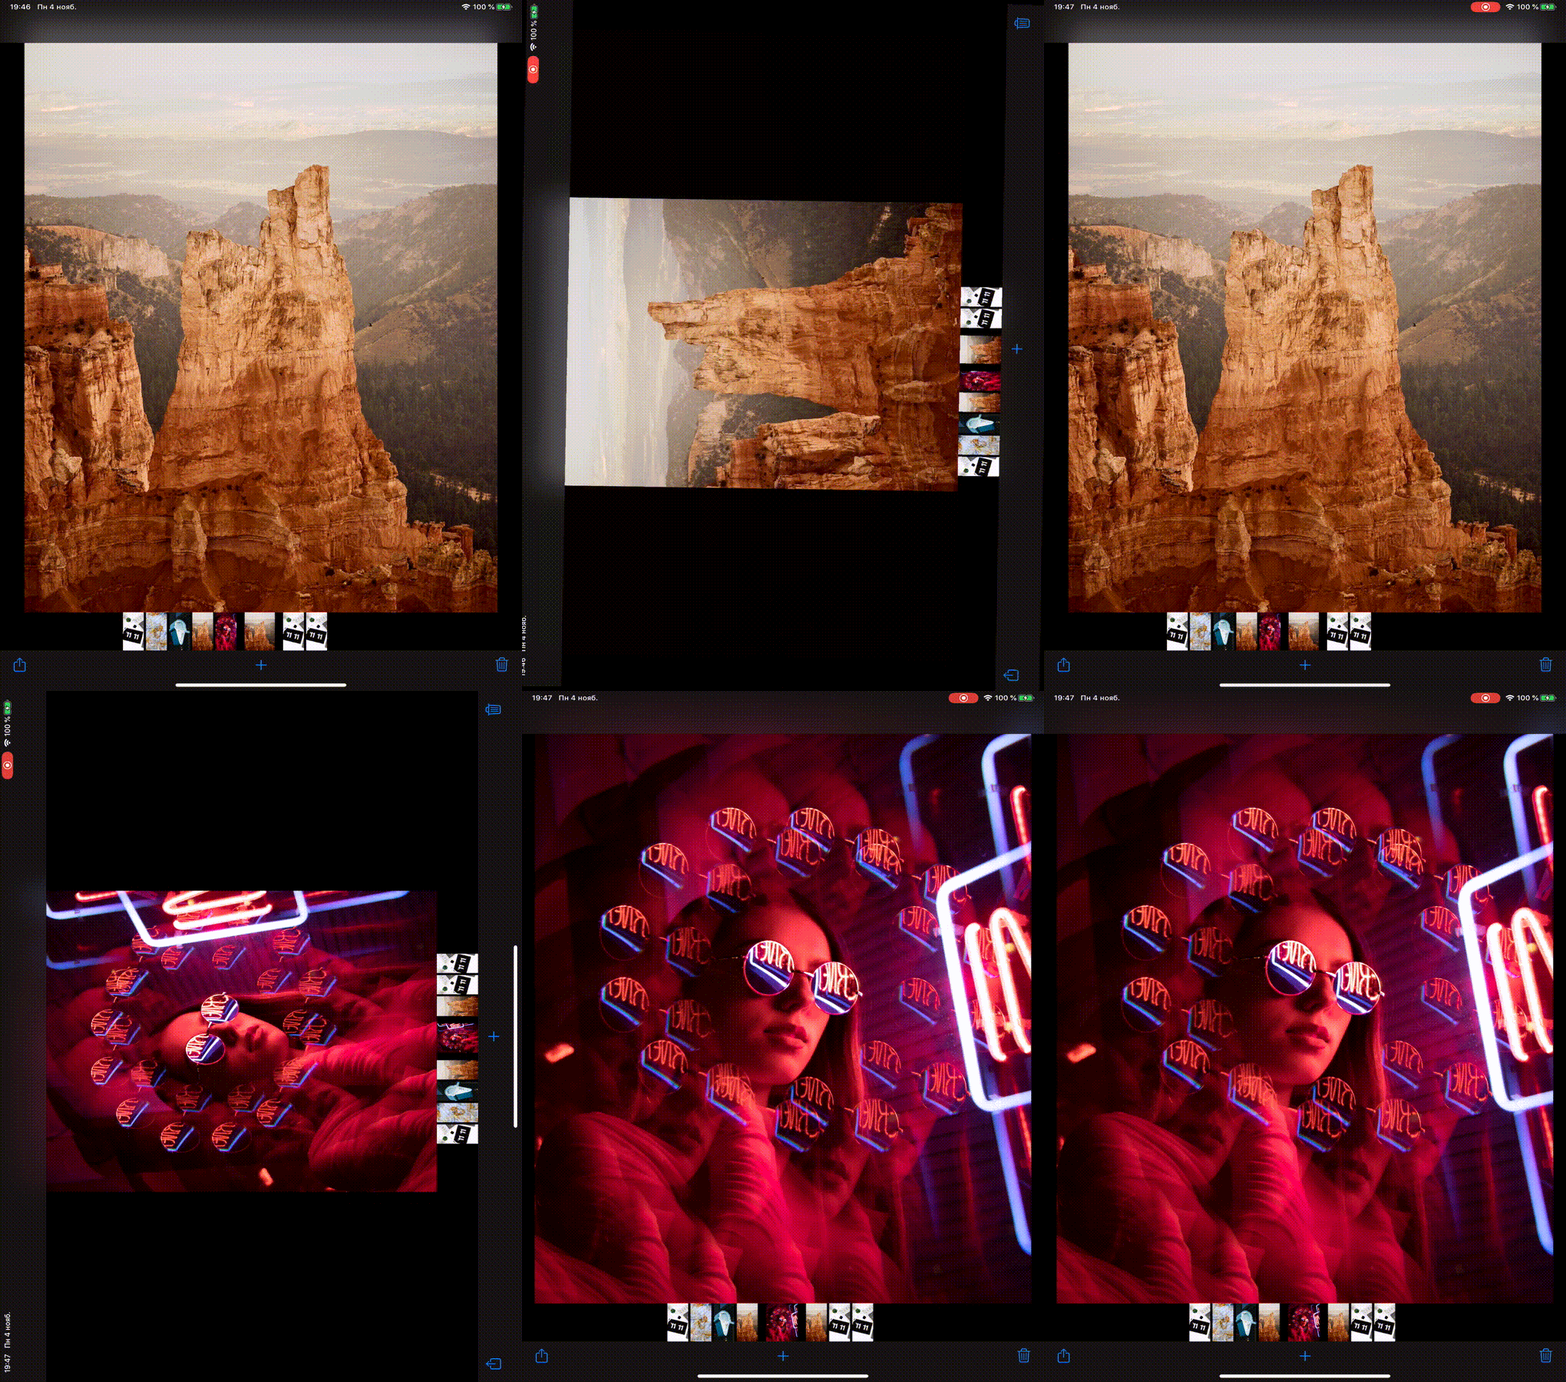
}Чтобы при смене ориентации не потерять нужный
contentOffset, можно обновлять targetIndexPath в scrollView.delegate. При смене ориентации лейаут будет инвалидироваться, если переопределить shouldInvalidateLayout(forBoundsChange:). При смене bounds лейаут попросит уточнить contentOffset, для его уточнения нужно переопределить targetContentOffset(forProposedContentOffset:). Apple:During layout updates, or when transitioning between layouts, the collection view calls this method to give you the opportunity to change the proposed content offset to use at the end of the animation. You might override this method if the animations or transition might cause items to be positioned in a way that is not optimal for your design.The collection view calls this method after calling the
prepare()andcollectionViewContentSizemethods.
override func targetContentOffset(forProposedContentOffset proposedContentOffset: CGPoint) -> CGPoint {
    let targetOffset = super.targetContentOffset(forProposedContentOffset: proposedContentOffset)
    guard let layoutHandler = layoutHandler else {
        return targetOffset
    }
    let offset = CGFloat(layoutHandler.targetIndex) / CGFloat(itemsCount)
    return CGPoint(
        x: collectionViewContentSize.width * offset - farInset,
        y: targetOffset.y)
}

Спасибо, что прочитали!
Весь код можно найти на github.com/YetAnotherRzmn/PhotosApp
Комментариев нет:
Отправить комментарий